

Buy A ESPcopter:
Buy A ESPcopter:
65$ + 9$ worldwide shipping
[wpecpp name=”One unit ESPcopter” price=”74″ align=”left”]
Learn Robotics By Making and Programming Your Own Drones
Specifications:
- Small and lightweight, around 35g and about 90mm motor to motor Flight time up to 7 minutes with standard 240mAh Li-Po battery
- Standard micro-USB connector for charging which takes ~25min for the stock 260mAh Li-Po battery
- On-board low-energy radio@1mW based on the ESP8266-12E. Powerful 32-bit RISC CPU: Tensilica Xtensa LX106 running at 160 MHz (64kb flash, 96kb RAM) IEEE 802.11 b/g/n Wi-Fi connection
- MPU9250 9-DOF 3-Axis Accelerometer, 3-Axis Gyro, & 3-Axis Magnetometer
- Expansion header 2×6 pins 2.54mm pitch including power, GPIO I2C, and UART.
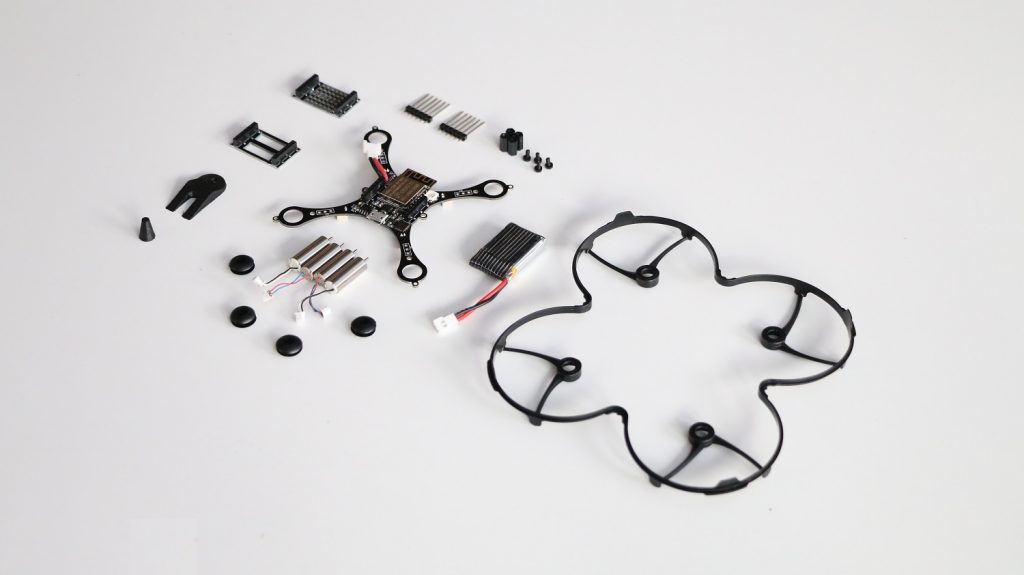
Box Content
- 1 Piece Drone.
- 1 Piece 240mAh Li-Po battery.
- 1 Piece propeller protector.
- 1 Piece battery holder shield
- 1 Piece Solder shield
- 4 Piece reserve propeller.
- 4 Piece rubber grommets
- 1 Piece propeller disassembly tool.
- 1 Piece motor assembly tool.
- 1 Piece installation instructions page.

REMOTEXY Uçuş Kodu Yükleme
ESPcopter ile programlama eğitimlerinden sonra uçuş kodunu drone’unuza geri yüklemek isterseniz. Bu yazı size yardımcı olacaktır.
İlk olarak uçuş kodunu bilgisayarınıza indiriniz.
Uçuş Kodu:
Daha sonra NodeMCU Flasher Programını bilgisayarınıza indiriniz.
İndirilen dosyayı masaüstüne çıkardıktan sonra nodemcu-flasher-master\Win64\Release klosürü içinde ESP8266Flasher.exe uygulamasını çalıştırın.

Confing bölümünden daha önce indirdiğiniz .Bin dosyasınının klasör bağlantısını ilk sekmeye yapıştırınız.
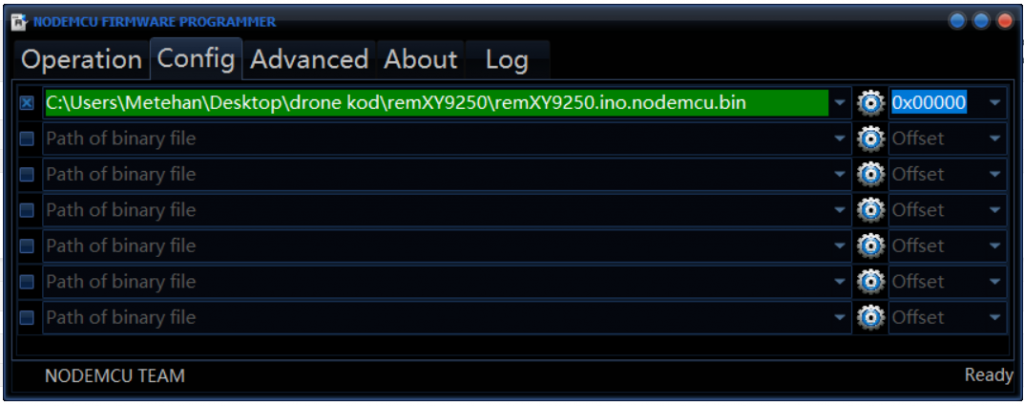
Drone bağlantısı yaptıktan sonra drone’u açık hale getirin ve flash(f) düğmesine basın. Kod yüklenmeye başlıyacaktır.

Yazılım başarı ile yüklendi.

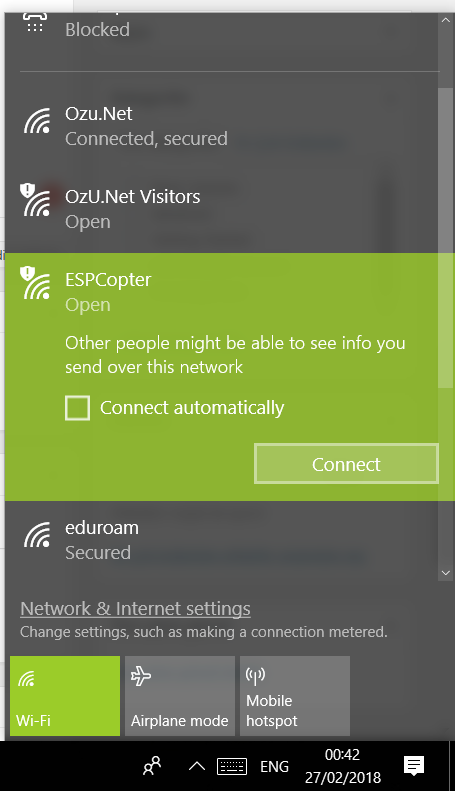
Telefon Uygulması REMOTEXY
Yazılımların yüklenmesini yaptıktan sonra drone açık konuma getirin. Telefonunuz wifi sekmesinde drone’nun ismini göreceksiniz.
WIFI_SSID “RemoteXY”
WIFI_PASSWORD “12345678”
Bağlantıyı yaptıktan sonra uygulamayı açınız ve aşağıda bulunan işlemleri yapınız.
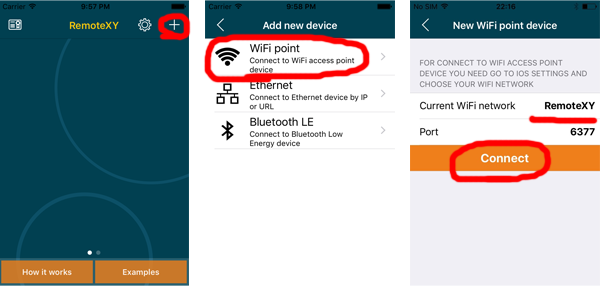

Not: Telefon uygulaması İSO işletim sisteminde sıkıntısız olarak çalışmaktardır.
İyi uçuşlar.

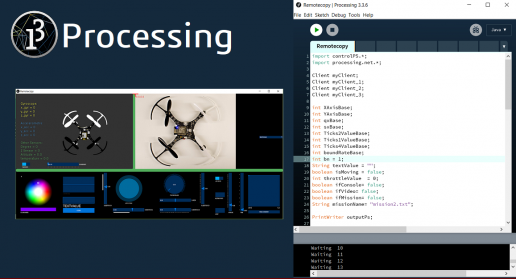
Control ESPcopter With Processing
After the Getting Started With Processing phase, You can control ESPcopter with Processing, First of All, you need to install there library to Processing which is
1-) controlP5
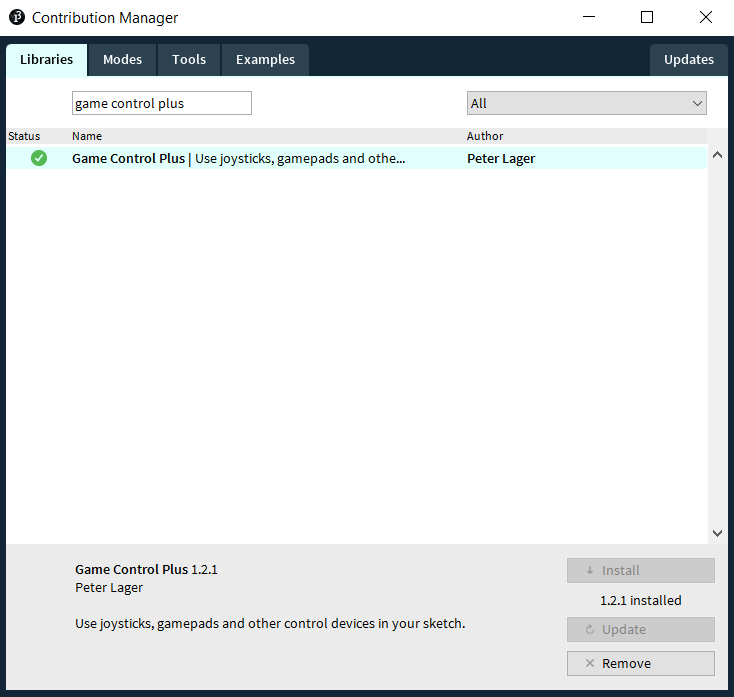
2-) game control plus
3-)opencv
To code please contact with [email protected]
How to Add Library:

How to Connect ESPcopter
Click to Connect
Start to Program
İf you have no gamepad. Return to false from İfconsol = True;

İf you have a Gamepad you need to do the some setting
First select your gamepad


Getting Started With Processing
Getting Started
Welcome to Processing! Start by visiting http://processing.org/download and selecting the Mac, Windows, or Linux version, depending on what machine you have. Installation on each machine is straightforward:
- On Windows, you'll have a .zip file. Double-click it, and drag the folder inside to a location on your hard disk. It could be Program Files or simply the desktop, but the important thing is for the processing folder to be pulled out of that .zip file. Then double-click processing.exe to start.
- The Mac OS X version is also a .zip file. Double-click it and drag the Processing icon to the Applications folder. If you're using someone else's machine and can't modify the Applications folder, just drag the application to the desktop. Then double-click the Processing icon to start.
- The Linux version is a .tar.gz file, which should be familiar to most Linux users. Download the file to your home directory, then open a terminal window, and type:
tar xvfz processing-xxxx.tgz
(Replace xxxx with the rest of the file's name, which is the version number.) This will create a folder named processing-2.0 or something similar. Then change to that directory:
cd processing-xxxx
and run it:
./processing
With any luck, the main Processing window will now be visible. Everyone's setup is different, so if the program didn't start, or you're otherwise stuck, visit the troubleshooting page for possible solutions.

The Processing Development Environment.
Your First Program
You're now running the Processing Development Environment (or PDE). There's not much to it; the large area is the Text Editor, and there's a row of buttons across the top; this is the toolbar. Below the editor is the Message Area, and below that is the Console. The Message Area is used for one line messages, and the Console is used for more technical details.
In the editor, type the following:
ellipse(50, 50, 80, 80);
This line of code means "draw an ellipse, with the center 50 pixels over from the left and 50 pixels down from the top, with a width and height of 80 pixels." Click the Run button the (triangle button in the Toolbar).
If you've typed everything correctly, you'll see a circle on your screen. If you didn't type it correctly, the Message Area will turn red and complain about an error. If this happens, make sure that you've copied the example code exactly: the numbers should be contained within parentheses and have commas between each of them, and the line should end with a semicolon.
One of the most difficult things about getting started with programming is that you have to be very specific about the syntax. The Processing software isn't always smart enough to know what you mean, and can be quite fussy about the placement of punctuation. You'll get used to it with a little practice.
Next, we'll skip ahead to a sketch that's a little more exciting. Delete the text from the last example, and try this:

void setup() {
  size(480, 120);
}

void draw() {
  if (mousePressed) {
    fill(0);
  } else {
    fill(255);
  }
  ellipse(mouseX, mouseY, 80, 80);
}
This program creates a window that is 480 pixels wide and 120 pixels high, and then starts drawing white circles at the position of the mouse. When a mouse button is pressed, the circle color changes to black. We'll explain more about the elements of this program in detail later. For now, run the code, move the mouse, and click to see what it does. While the sketch is running, the Run button will change to a square “stop” icon, which you can click to halt the sketch.

Getting Started with BLYNK
IN ORDER TO USE BLYNK APP YOU WOULD NEED:
- Hardware that works with Blynk. Check the full list of supported hardware here
- If your hardware doesn't have connectivity on board, you can use shields like Ethernet, WiFi, GPRS and many others. Blynk also works over Bluetooth and USB (☝️ USB is not for newbies!)
1. DOWNLOAD BLYNK APP FOR ANDROID OR IOS
2. GET THE AUTH TOKEN
In order to connect Blynk App and your hardware, you need an Auth Token.
- Create a new account in Blynk App.
- Create a New Project. Then choose the board and connection you will use.
- After the project was created, we will send you Auth Token over email.
- Check your email inbox and find the Auth Token.
3. INSTALL BLYNK LIBRARY
☝️ Blynk library should be installed manually. Follow the instructions:
- Download the latest release .zip file.
- Unzip it. You will notice that archive contains several folders and several libraries.
- Copy all these libraries to your_sketchbook_folder of Arduino IDE. To find the location of your_sketchbook_folder, go to top menu in Arduino IDE: File -> Preferences (if you are using Mac OS - go to Arduino → Preferences)
The structure of your your_sketchbook_folder should now look like this, along with your other sketches (if you have them):
your_sketchbook_folder/libraries/Blynk
your_sketchbook_folder/libraries/BlynkESP8266_Lib
...
your_sketchbook_folder/tools/BlynkUpdater
your_sketchbook_folder/tools/BlynkUsbScript
...
☝️ Note that libraries should go to libraries and tools to tools
3. CREATE YOUR FIRST EXAMPLE SKETCH CODE
Blynk works with hundreds of hardware models and connection types. We prepared Blynk Examples Sketch Builder that allows you to create example code for your hardware.
OPEN BLYNK SKETCH CODE BUILDER- Choose Your board (for example: Arduino UNO)
- Choose your connection (WiFi, Ethernet, Bluetooth, USB...)
The first example you need is:
GettingStarted/BlynkBlink
4. PASTE THE AUTH TOKEN
• In the example sketch, find this line:
char auth[] = "YourAuthToken";
• Change it with your Auth Token (it should be in your email inbox after you created the Project in the Blynk app. Now it should exactly like this (☝️ don't forget the " "):
char auth[] = "53e4da8793764b6197fc44a673ce4e21";
• 🔥 Flash the code to your hardware
• Open serial monitor in Arduino IDE. You should see something like this
     ___  __          __
    / _ )/ /_ _____  / /__
   / _  / / // / _ \/  '_/
  /____/_/\_, /_//_/_/\_\
         /___/    v0.4.4

    [1240] Connecting to YourWiFi
    [1240] Connected to YourWiFi
    [1240] My IP: 192.168.10.172
    [1240] Blynk v0.4.4
    [5001] Connecting to blynk-cloud.com:8442
    [5329] Ready (ping: 1ms)
Congrats! You are connected! 🎉

Installing ARDUİNO
Installing Arduino
Get the latest version from the download page. You can choose between the Installer (.exe) and the Zip packages. We suggest you use the first one that installs directly everything you need to use the Arduino Software (IDE), including the drivers. With the Zip package you need to install the drivers manually. The Zip file is also useful if you want to create aportable installation.
When the download finishes, proceed with the installation and please allow the driver installation process when you get a warning from the operating system.
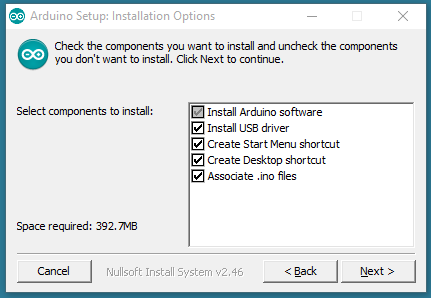
Choose the components to install
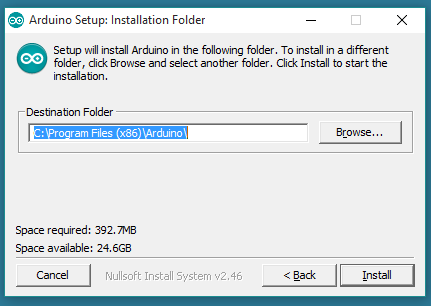
Choose the installation directory (we suggest to keep the default one)
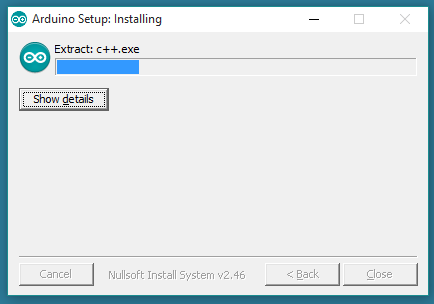
The process will extract and install all the required files to execute properly the Arduino Software (IDE)
Installing the ESP8266 Arduino Addon
There are a variety of development environments that can be equipped to program the ESP8266. You can go with a simple Notepad/gcc setup, or fine-tune an Eclipse environment, use a virtual machine provided by Espressif, or come up with something of your own.
Fortunately, the amazing ESP8266 community recently took the IDE selection a step further by creating an Arduino addon. If you’re just getting started programming the ESP8266, this is the environment we recommend beginning with, and the one we’ll document in this tutorial.
This ESP8266 addon for Arduino is based on the amazing work by Ivan Grokhotkov and the rest of the ESP8266 community. Check out the ESP8266 Arduino GitHub repository for more information.
Installing the Addon With the Arduino Boards Manager
With the release of Arduino 1.6.4, adding third party boards to the Arduino IDE is easily achieved through the new board manager. If you’re running an older version of Arduino (1.6.3 or earlier), we recommend upgrading now. As always, you can download the latest version of Arduino from arduino.cc.
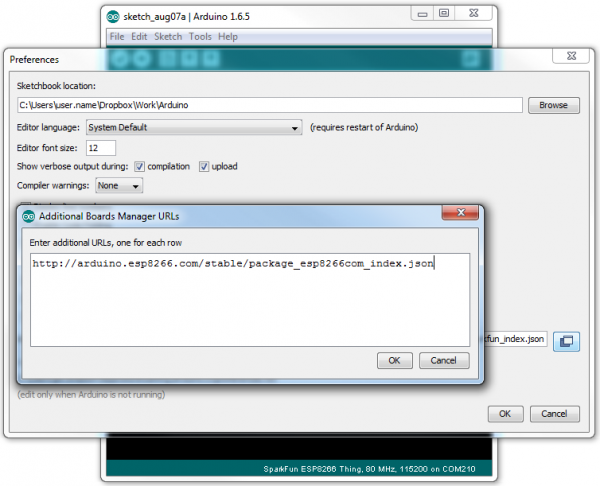
To begin, we’ll need to update the board manager with a custom URL. Open up Arduino, then go to the Preferences (File> Preferences). Then, towards the bottom of the window, copy this URL into the “Additional Board Manager URLs” text box:
http://arduino.esp8266.com/stable/package_esp8266com_index.json
If you already have a URL in there, and want to keep it, you can separate multiple URLs by placing a comma between them. (Arduino 1.6.5 added an expanded text box, separate links in here by line.)
Hit OK. Then navigate to the Board Manager by going to Tools > Boards > Boards Manager. There should be a couple new entries in addition to the standard Arduino boards. Look for esp8266. Click on that entry, then select Install.
You need to install 2.3.0 version of esp8266 library.
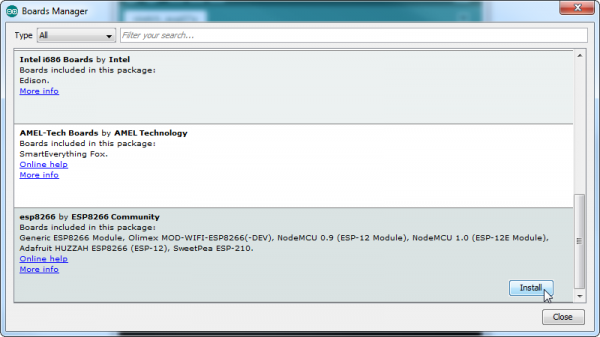
The board definitions and tools for the ESP8266 Thing include a whole new set of gcc, g++, and other reasonably large, compiled binaries, so it may take a few minutes to download and install (the archived file is ~110MB). Once the installation has completed, an Arduino-blue “INSTALLED” will appear next to the entry.
Selecting the ESP8266 Thing Board
With the Board addon installed, all that’s left to do is select “ESP8266 Thing” from the Tools > Boards menu.

then select your FTDI’s port number under the Tools > Port menu. İf you do not see com port, you need to install driver s software by using the following button.
ESPcopter Driver
If you are using mac diveces and espcopter is not list in your post list, you need to do following steps.
- Shut Down
- Hold
mac+ R during boot to enter recovery mode - Open a terminal
- type
spctl kext-consent disableand press enter - Reboot
- Go to “System Preferences” -> “Security & Privacy”
- In the bottom of the window, you will see a message “System software from developer “SiLabs” was blocked from loading.”
- Click on “Allow” button
- Restart your Mac
- Now my device is listed as
/dev/cu.SLAB_USBtoUARTand everything work as expected.