

Motor Speed Control With Processing
Screenshot

Arduino Code:
#include

const char WiFiAPPSK[] = "";
WiFiServer server(80);

#define blueLed 16
#define redLed 2
#define greenLed 0

int red = 0, green = 0, blue = 0;
int pinPWM[4] = {14, 15, 12, 13}; //Define PWM pin
int throttle = 0;
String strial;
String inString = "";
int currentColor = 0;
void setup() {
  Serial.begin(9600);
 analogWriteFreq(20000);
  pinMode(redLed, OUTPUT);
  pinMode(greenLed, OUTPUT);
  pinMode(blueLed, OUTPUT);

  pinMode(pinPWM[0], OUTPUT);
  pinMode(pinPWM[1], OUTPUT);
  pinMode(pinPWM[2], OUTPUT);
  pinMode(pinPWM[3], OUTPUT);

 setupWiFi();

}

void loop() {
WiFiClient client = server.available();
 Serial.println("waiting... ");

  Serial.println(client);
  if (client ) {
    while (client.connected()) {
      while(1){
      if (client.available()) {

        int inChar;
        inChar = client.read();

  if (isDigit(inChar)) {
    // convert the incoming byte to a char
    // and add it to the string:
    inString += (char)inChar;
  }

   if (inChar == '*') {
    // do something different for each value of currentColor:
    switch (currentColor) {
      case 0:    // 0 = red
        red = inString.toInt();
        // clear the string for new input:
        inString = "";
        break;
      case 1:    // 1 = green:
        green = inString.toInt();
        // clear the string for new input:
        inString = "";
        break;
    }
    currentColor++;
  }
  // if you get a newline, you know you've got
  // the last color, i.e. blue:
  if (inChar == '?') {
    throttle = inString.toInt();
    // clear the string for new input:
    inString = "";
    // reset the color counter:
    currentColor = 0;
  }
    }


     analogWrite(pinPWM[0], throttle);
     analogWrite(pinPWM[1], throttle);
     analogWrite(pinPWM[2], throttle);
     analogWrite(pinPWM[3], throttle);


    }

   // Serial.println("Client disconnected.");
   // client.stop();
 }

 }
}


void setupWiFi(){
  WiFi.mode(WIFI_AP);

  // Do a little work to get a unique-ish name. Append the
  // last two bytes of the MAC (HEX'd) to "Thing-":
  uint8_t mac[WL_MAC_ADDR_LENGTH];
  WiFi.softAPmacAddress(mac);
  String macID = String(mac[WL_MAC_ADDR_LENGTH - 2], HEX) +
                 String(mac[WL_MAC_ADDR_LENGTH - 1], HEX);
  macID.toUpperCase();
  String AP_NameString = "ESPCopter";

  char AP_NameChar[AP_NameString.length() + 1];
  memset(AP_NameChar, 0, AP_NameString.length() + 1);

  for (int i=0; i<AP_NameString.length(); i++)
    AP_NameChar[i] = AP_NameString.charAt(i);

   WiFi.softAP(AP_NameChar, WiFiAPPSK);

   server.begin();
}
Processing Code:
import processing.net.*;
import controlP5.*;
Client myClient;
ControlP5 cp5;
Knob myKnobA;
String command= "";

void setup() {
   size(500, 500,P3D);
   background(0);
    myClient = new Client(this, "192.168.4.1", 80);
   println(myClient.ip());
     cp5 = new ControlP5(this);
  myKnobA = cp5.addKnob("knobValue")
               .setRange(0,100)
               .setValue(0)
               .setPosition(200,200)
               .setRadius(50)
               .setNumberOfTickMarks(50)
               .setTickMarkLength(4)
               .snapToTickMarks(true)
               .setColorForeground(color(255))
               .setColorBackground(color(0, 160, 100))
               .setColorActive(color(255,255,0))
               .setDragDirection(Knob.HORIZONTAL)
               ;

}

 void draw() {


 }

void knobValue(int theValue) {
  println("a knob event. "+theValue);
  command =  0+ "*" + 0+ "*" + theValue + "?" ;
    myClient.write(command);

}
RGB LED Control with Processing
Screenshot

Arduino Code
#include

const char WiFiAPPSK[] = "";
WiFiServer server(80);

#define blueLed 16
#define redLed 2
#define greenLed 0

int red = 0, green = 0, blue = 0;

String strial;
String inString = "";
int currentColor = 0;
void setup() {
  Serial.begin(9600);

  pinMode(redLed, OUTPUT);
  pinMode(greenLed, OUTPUT);
  pinMode(blueLed, OUTPUT);


 setupWiFi();

}

void loop() {
WiFiClient client = server.available();
 Serial.println("waiting... ");

  Serial.println(client);
  if (client ) {
    while (client.connected()) {
      while(1){
      if (client.available()) {

        int inChar;
        inChar = client.read();


     if (isDigit(inChar)) {
    // convert the incoming byte to a char
    // and add it to the string:
    inString += (char)inChar;
  }

   if (inChar == '*') {
    // do something different for each value of currentColor:
    switch (currentColor) {
      case 0:    // 0 = red
        red = 4*inString.toInt();
        // clear the string for new input:
        inString = "";
        break;
      case 1:    // 1 = green:
        green = 4*inString.toInt();
        // clear the string for new input:
        inString = "";
        break;
    }
    currentColor++;
  }
  // if you get a newline, you know you've got
  // the last color, i.e. blue:
  if (inChar == '?') {
    blue = 4*inString.toInt();
    // clear the string for new input:
    inString = "";
    // reset the color counter:
    currentColor = 0;
  }
    }

   analogWrite(blueLed,PWMRANGE-blue);
  analogWrite(redLed, PWMRANGE-red);
  analogWrite(greenLed, green);

    }

   // Serial.println("Client disconnected.");
   // client.stop();
 }

 }
}


void setupWiFi(){
  WiFi.mode(WIFI_AP);

  // Do a little work to get a unique-ish name. Append the
  // last two bytes of the MAC (HEX'd) to "Thing-":
  uint8_t mac[WL_MAC_ADDR_LENGTH];
  WiFi.softAPmacAddress(mac);
  String macID = String(mac[WL_MAC_ADDR_LENGTH - 2], HEX) +
                 String(mac[WL_MAC_ADDR_LENGTH - 1], HEX);
  macID.toUpperCase();
  String AP_NameString = "ESPCopter";

  char AP_NameChar[AP_NameString.length() + 1];
  memset(AP_NameChar, 0, AP_NameString.length() + 1);

  for (int i=0; i<AP_NameString.length(); i++)
    AP_NameChar[i] = AP_NameString.charAt(i);

   WiFi.softAP(AP_NameChar, WiFiAPPSK);

   server.begin();
}
Processing Code
import processing.net.*;
import controlP5.*;
Client myClient;
ControlP5 cp5;

String command= "";

void setup() {
   size(500, 500,P3D);
   background(0);
    myClient = new Client(this, "192.168.4.1", 80);
   println(myClient.ip());

  cp5 = new ControlP5(this);
  cp5.addColorWheel("colorWheel", 125 , 125 , 225 ).setRGB(color(128,0,255));
  noStroke();

}

 void draw() {

   command =  cp5.get(ColorWheel.class,"colorWheel").b() + "*" + cp5.get(ColorWheel.class,"colorWheel").g() + "*" +cp5.get(ColorWheel.class,"colorWheel").r() + "?" ;


 }
 void colorWheel(int theValue) {
 println("from client: " + command);
 myClient.write(command);

}
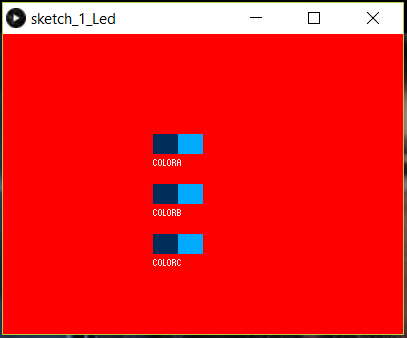
Button Control with Processing
Screenshot
Arduino Code:
#include

const char WiFiAPPSK[] = "";
WiFiServer server(80);

#define blueLed 16
#define redLed 2
#define greenLed 0


void setup() {
  Serial.begin(9600);

  pinMode(redLed, OUTPUT);
  pinMode(greenLed, OUTPUT);
  pinMode(blueLed, OUTPUT);


 setupWiFi();

}

void loop() {
WiFiClient client = server.available();
 Serial.println("waiting... ");

  Serial.println(client);
  if (client ) {
    while (client.connected()) {
      while(1){
      if (client.available()) {

        int inChar;
        inChar = client.read();
        Serial.println(inChar);
         switch (inChar) {
         case 'A':
         analogWrite(blueLed,0);
         break;
         case 'a':
         analogWrite(blueLed,PWMRANGE);
         break;
         case 'B':
         analogWrite(redLed, PWMRANGE);
         break;
         case 'b':
         analogWrite(redLed, 0);
         break;
         case 'C':
         analogWrite(greenLed, PWMRANGE);
         break;
         case 'c':
         analogWrite(greenLed, 0);
         break;
      }
    }
    }

   // Serial.println("Client disconnected.");
   // client.stop();
 }

 }
}


void setupWiFi(){
  WiFi.mode(WIFI_AP);

  // Do a little work to get a unique-ish name. Append the
  // last two bytes of the MAC (HEX'd) to "Thing-":
  uint8_t mac[WL_MAC_ADDR_LENGTH];
  WiFi.softAPmacAddress(mac);
  String macID = String(mac[WL_MAC_ADDR_LENGTH - 2], HEX) +
                 String(mac[WL_MAC_ADDR_LENGTH - 1], HEX);
  macID.toUpperCase();
  String AP_NameString = "ESPCopter";

  char AP_NameChar[AP_NameString.length() + 1];
  memset(AP_NameChar, 0, AP_NameString.length() + 1);

  for (int i=0; i<AP_NameString.length(); i++)
    AP_NameChar[i] = AP_NameString.charAt(i);

   WiFi.softAP(AP_NameChar, WiFiAPPSK);

   server.begin();
}
Processing Code:
import processing.net.*;
import controlP5.*;
Client myClient;
ControlP5 cp5;
String command= "";
int c1,c2;
void setup() {
size(400, 300,P3D);
background(0);
myClient = new Client(this, "192.168.4.1", 80);
println(myClient.ip());

cp5 = new ControlP5(this);

cp5.addToggle("colorA")
.setPosition(150,100)
.setSize(50,20)
.setValue(false)
.setMode(ControlP5.SWITCH)
;

cp5.addToggle("colorB")
.setPosition(150,150)
.setSize(50,20)
.setValue(false)
.setMode(ControlP5.SWITCH)
;

cp5.addToggle("colorC")
.setPosition(150,200)
.setSize(50,20)
.setValue(false)
.setMode(ControlP5.SWITCH)
;

}

void draw() {

}

// function colorA will receive changes from
// controller with name colorA
void colorA(boolean theFlag) {
println("a button event from colorA: "+theFlag);
background(0,255,0);
if(theFlag == true){
command = "A";
} else {
command = "a";
}

myClient.write(command);
}

// function colorB will receive changes from
// controller with name colorB
void colorB(boolean theFlag) {
println("a button event from colorB: "+theFlag);
background(0,0,255);
if(theFlag == true){
command = "B";
} else {
command = "b";
}
myClient.write(command);
}

// function colorC will receive changes from
// controller with name colorC
void colorC(boolean theFlag) {
println("a button event from colorC: "+theFlag);
background(255,0,0);
if(theFlag == true){
command = "C";
} else {
command = "c";
}

myClient.write(command);
}

1-) Getting Started with RemoteXY
https://youtu.be/G5v5TPlEQcQ
ESPcopter Control Application (RemoteXY):
Connection:
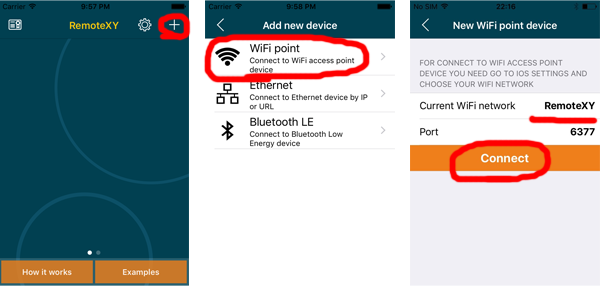
After installing the RemoteXY application on your phone, turn ESPcopter on and connect your phone and ESPcopter via wifi network.
After you make the connection, open RemoteXY and do the following steps:
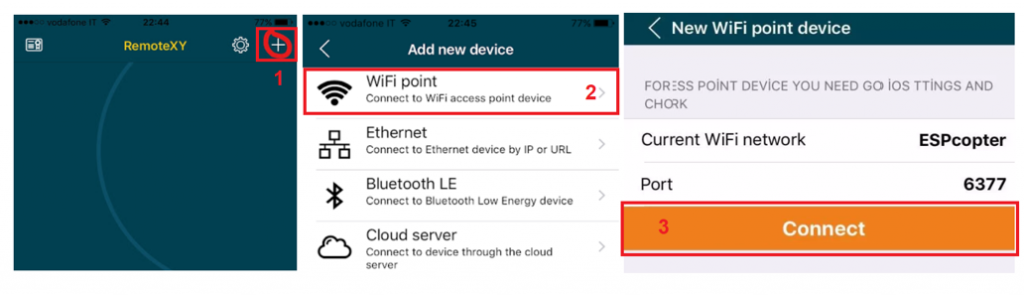
After making the connection, the screen below will open automatically. After the first connection. There will be ESPcopter box in RemoteXY app. You can connect ESPcopter by clicking this box.

3.1-) Control Review:
Joysticks:
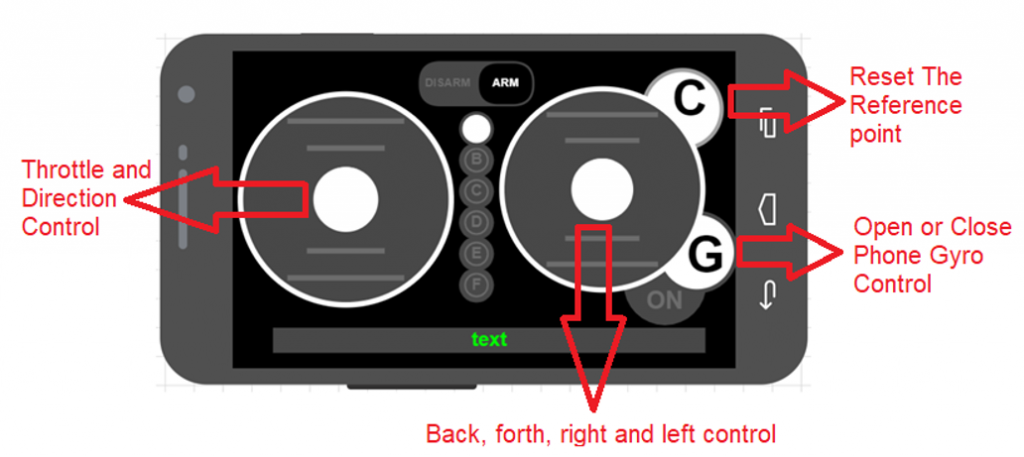
Control Review:
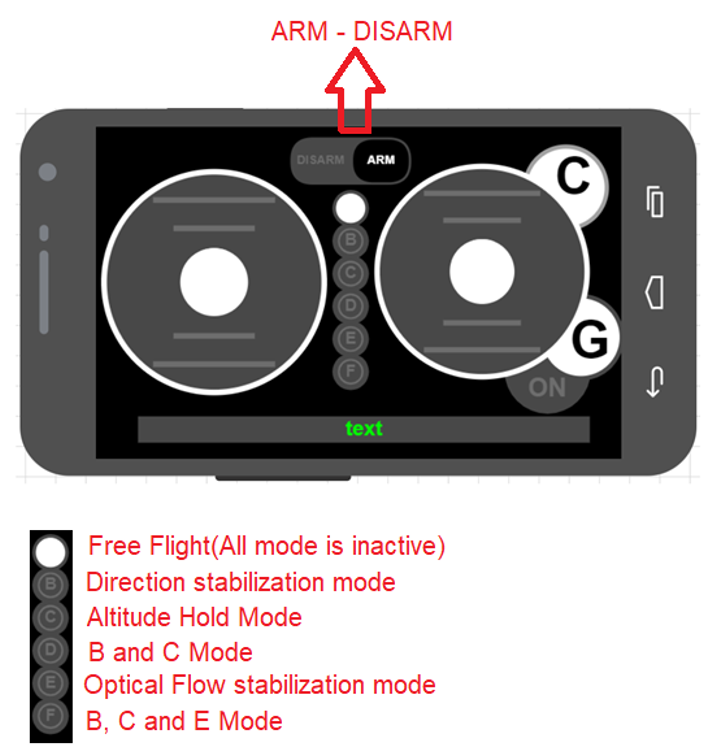
Note: If you use direction stabilization mode. you need to make sure that magnetometer calibration is done truly.

Buy A ESPcopter:
Buy A ESPcopter:
65$ + 9$ worldwide shipping
[wpecpp name=”One unit ESPcopter” price=”74″ align=”left”]
Learn Robotics By Making and Programming Your Own Drones
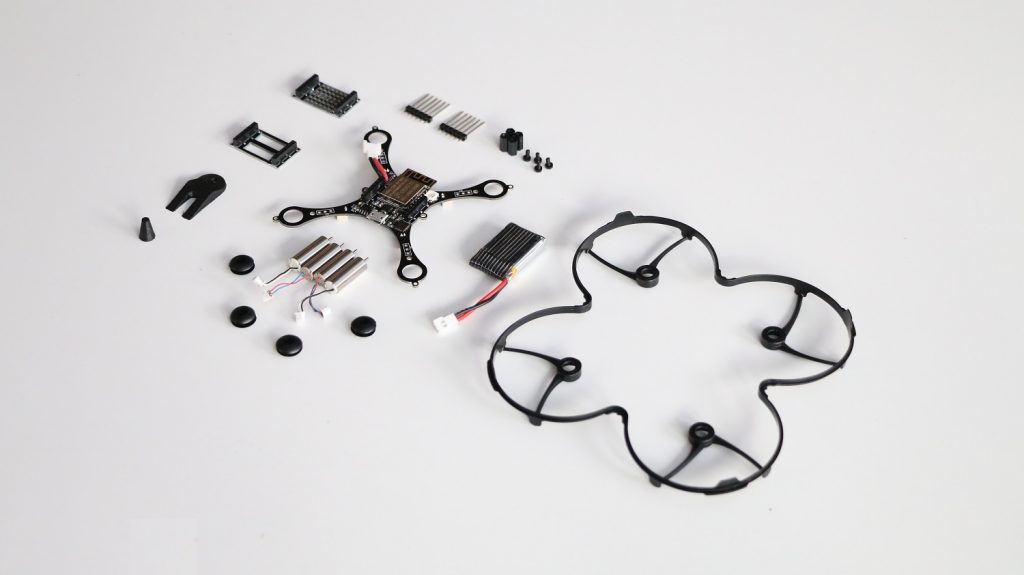
Specifications:
- Small and lightweight, around 35g and about 90mm motor to motor Flight time up to 7 minutes with standard 240mAh Li-Po battery
- Standard micro-USB connector for charging which takes ~25min for the stock 260mAh Li-Po battery
- On-board low-energy radio@1mW based on the ESP8266-12E. Powerful 32-bit RISC CPU: Tensilica Xtensa LX106 running at 160 MHz (64kb flash, 96kb RAM) IEEE 802.11 b/g/n Wi-Fi connection
- MPU9250 9-DOF 3-Axis Accelerometer, 3-Axis Gyro, & 3-Axis Magnetometer
- Expansion header 2×6 pins 2.54mm pitch including power, GPIO I2C, and UART.
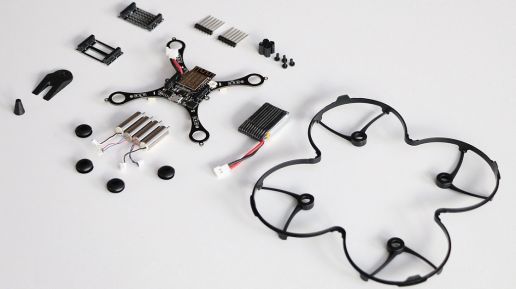
Box Content
- 1 Piece Drone.
- 1 Piece 240mAh Li-Po battery.
- 1 Piece propeller protector.
- 1 Piece battery holder shield
- 1 Piece Solder shield
- 4 Piece reserve propeller.
- 4 Piece rubber grommets
- 1 Piece propeller disassembly tool.
- 1 Piece motor assembly tool.
- 1 Piece installation instructions page.
REMOTEXY Uçuş Kodu Yükleme
ESPcopter ile programlama eğitimlerinden sonra uçuş kodunu drone’unuza geri yüklemek isterseniz. Bu yazı size yardımcı olacaktır.
İlk olarak uçuş kodunu bilgisayarınıza indiriniz.
Uçuş Kodu:
Daha sonra NodeMCU Flasher Programını bilgisayarınıza indiriniz.
İndirilen dosyayı masaüstüne çıkardıktan sonra nodemcu-flasher-master\Win64\Release klosürü içinde ESP8266Flasher.exe uygulamasını çalıştırın.

Confing bölümünden daha önce indirdiğiniz .Bin dosyasınının klasör bağlantısını ilk sekmeye yapıştırınız.
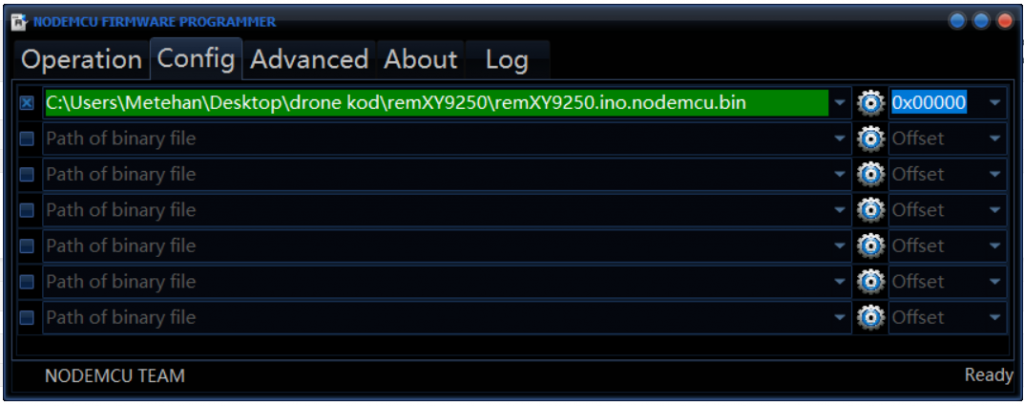
Drone bağlantısı yaptıktan sonra drone’u açık hale getirin ve flash(f) düğmesine basın. Kod yüklenmeye başlıyacaktır.

Yazılım başarı ile yüklendi.

Telefon Uygulması REMOTEXY
Yazılımların yüklenmesini yaptıktan sonra drone açık konuma getirin. Telefonunuz wifi sekmesinde drone’nun ismini göreceksiniz.
WIFI_SSID “RemoteXY”
WIFI_PASSWORD “12345678”
Bağlantıyı yaptıktan sonra uygulamayı açınız ve aşağıda bulunan işlemleri yapınız.

Not: Telefon uygulaması İSO işletim sisteminde sıkıntısız olarak çalışmaktardır.
İyi uçuşlar.